Your Drupal website may have served you well. However, the WordPress ecosystem in terms of plugins, themes, and support can offer you much more in terms of expanding your website and giving your visitors a better experience.
The thought of moving all your content, media, users, themes, and articles can be a difficult task. While the thought of hiring a developer or buying an expensive migration tool may sound like an easy way out, I will be providing you a step by step guide to migrate your site from Drupal to WordPress inexpensively and easily with proper planning and attention to detail.
Contents
- Why Migrate from Drupal to WordPress?
- Things to do before doing the migration
- 01Establish a plan
- 02Selecting a Host
- 03Setting up a temporary domain
- 04Create a WordPress instance
- 05SEO preservation
- 06Back-Up your site
- How to Migrate your website from Drupal to WordPress?
- Step 1 – Installing the Plugin
- Step 2- Obtain the Drupal database parameters
- Step 3 – Importing WordPress content
- Step 4 – Setting up a database connection
- Step 5 – Customize the migration
- Step 6 – Start the import
- Step 7 – Modify your links(optional)
- Things to do after the migration
- Go live
- Conclusion
Why Migrate from Drupal to WordPress?
Drupal is a great content management system with plenty of robust features, but there are many reasons that you might want to move to WordPress.
Easier to Use
You don’t need to have any coding knowledge to build and manage WordPress web sites. It is an easy to use platform that has great features like drag and drop editors, media management and content editing which can be done with just a few clicks. So you can even cut down on the cost of hiring a developer to manage the site.
Better Plugin Support
WordPress offers more than 55,000 plugins on its plugin directory in comparison to around 8,000 on Drupal. This opens up a new level of customization and functional scope for your website, especially if you are migrating to WordPress.
Better Community Support
WordPress has a vast online community that provides numerous tutorials and documentation. This support goes a long way when you have any problems setting up your website. They also keep the plugin directory growing and up to date.
Will endure into the future
WordPress powers a large part of the websites on the internet. Many of them are integrated with many plugins on the WordPress directory as well and as such, WordPress will be an essential part of the internet well into the future.
Things to do before doing the migration
01Establish a plan
Before starting, plan how exactly you’re going to do the migration. Decide whether you’re moving all your content along with the theme or redesigning it completely and whether you’re preserving the site architecture, hosting and domain name. Planning will make you much more organized and ensure a seamless migration.
Ensure you make a list of all the page links, internal links, and external links so that you can ensure they are all functional post-migration.
02Selecting a Host
Since you have a Drupal installation, it is assumed that you already have a hosting provider. But make sure it is well compatible with WordPress installations. Selecting a managed WordPress hosting service is much better since it offers more security, higher speeds and some hosts support daily backups.
03Setting up a temporary domain
Set up your new domain, or a sub-domain to install WordPress to migrate your content from Drupal. The URL can be redirected once the migration is done. You’ll need to make sure that your existing hosting supports WordPress if not, you’ll need a new hosting service.
If you are looking for a great hosting deal, look no further, our Hosting Finder Tool can be a great place to start as it allows you to choose a deal that suits you.
04Create a WordPress instance
Before you start the migration you should install and set up a blank instance of WordPress in your temporary domain. This process might differ from one host to another but this tutorial will guide you through the installation.
05SEO preservation
In case the URLs in your current site are not SEO friendly now is the time to fix it. You can use crawlers like Xenu Link Sleuth or Screaming Frog SEO Spider to grab the links on your site. Make a list of URLs and shorten them and make them descriptive accurately explaining the content of that page.
06Back-Up your site
We cannot stress this point enough. It is extremely important that you backup your Drupal site (as well as your WordPress site in case you’re migrating to an existing one) before you start the migration. This removes the risk of losing your data in case you run into any issues along the way.
How to Migrate your website from Drupal to WordPress?
There are several different options available like manual migration, using a migration script and installing a plugin or automated migration software to perform site-wide migration from Drupal to WordPress. In this tutorial, we will be using the FG Drupal to WordPress plugin to perform the migration.
I will be using the free version of this plugin and it has the necessary options to carry out a regular migration. However, if you’re planning to migrate a large scale site with multiple users, authors, and custom posts, the premium version might be a better alternative.
Step 1 – Installing the Plugin
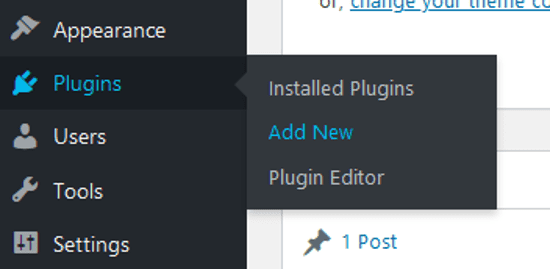
1. First login to your WordPress site, once you’re in your dashboard go to ‘Plugins’ then click ‘Add New’:

2. Search for the plugin by typing ‘FG Drupal to WordPress’ on the search bar.

3. Once it appears, click on ‘Install Now’.

4. After the plugin installs the button text will change to ‘Activate’. Click on it.
5. You now have the option to immediately begin import or you can come back later through Tools > Import.
Step 2- Obtain the Drupal database parameters
Before you start the migration, identify your Drupal username, password, hostname, database name, and table prefix. These parameters can be easily found in your Drupal installation core files using an FTP client like FileZilla. Follow the simple steps below to figure out the parameters.
- Download an FTP client like Filezilla
- Navigate to your Drupal site’s default directory.
- Locate settings.php file
- Open it using a text editor and find and copy the necessary parameters.
- Save the details in a separate file for later use.
To go back to your plugin you can click Tools > Import. If you have correctly installed the plugin, you will see it in the list of plugins.

Click ‘Run Importer’.
Step 3 – Importing WordPress content
The first thing you will notice on the page is the button saying “Empty WordPress Content”.

Clicking on this will delete all categories, tags, posts, pages, and media. It is usually recommended that you have a blank installation of WordPress for the migration. In case you have any data or content already in your WordPress database, make sure to back it up before you proceed.
Alternatively, you have to select either of the options to remove only the previously imported data or remove all content.
Step 4 – Setting up a database connection
1. First, enter your live Drupal site’s URL to import media from that site to WordPress.

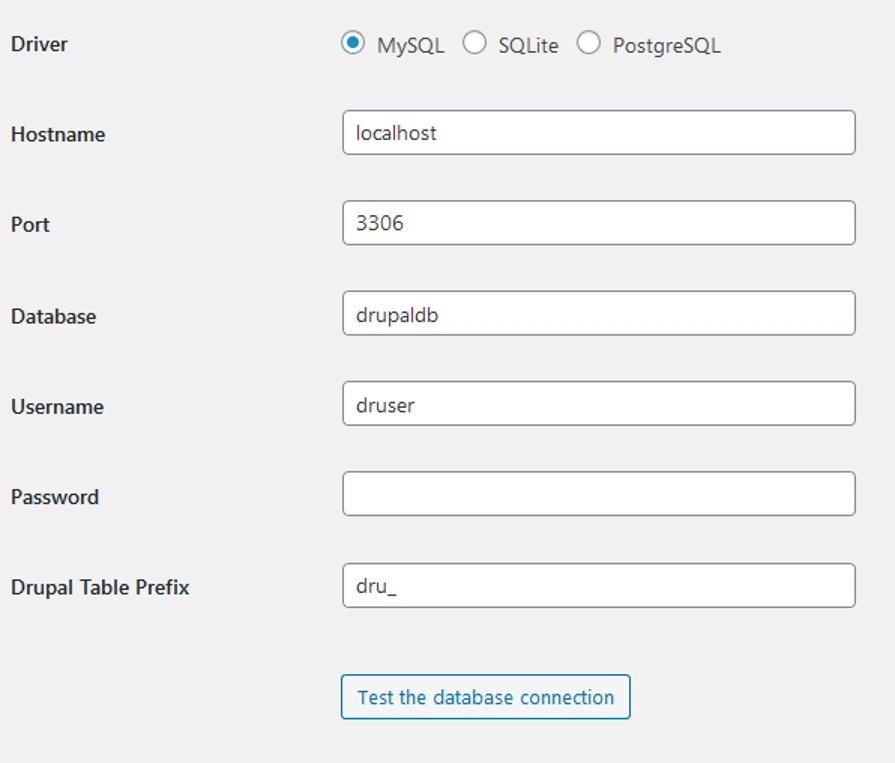
2. When you scroll down further, you will see the Drupal database parameter section. Go ahead and enter all the details that you extracted in step 2.

3. Once you’re done, hit the “Test the database connection button” to test your connection.
4. If the connection is successful, you should see the following message in green.

Note that if you don’t enter the underscore in Drupal Table Prefix, the connection will fail.
Step 5 – Customize the migration
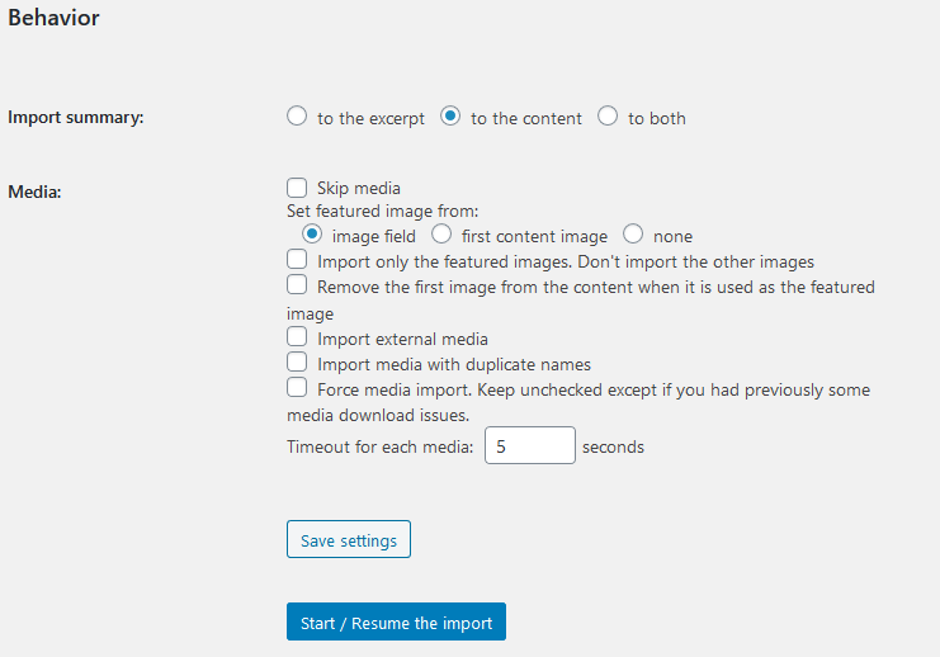
Next, you will need to set the configuration options for importing summary and media during the migration.

Import Summary
Through this option, you will specify how you would import your post summaries. By default. it selects ‘to the content’ option. This will import them using the Read more link.
Media
Next, you will see an array of options to select in the media section. First, you have the tickbox to check if you want to skip the process of importing media which will speed up the migration. There are a few extra settings including whether you want to import feature images or import from external media. Set your preferences based on your installation.
The ‘timeout for each media setting’ will set a download speed for images to completely download during the migration. If you think you’ll run into issues during the import you can increase this value.
If your images are large in size it is recommended that you use an image optimization tool like Imagify Image Optimizer to reduce their sizes.
Step 6 – Start the import
After everything is configured, click the Start/Resume the Import button resume the migration. The duration for this process will depend on the amount of content on your Drupal database. Once everything is completed the log box will display the complete log of the process.
Step 7 – Modify your links(optional)

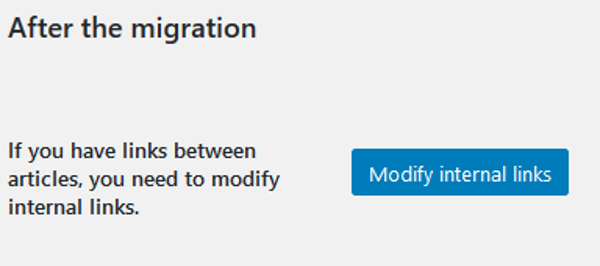
Even though this is optional, it is a good idea to perform this step once your migration is complete. By clicking the Modify Internal Links button you can change your permalinks and 301 directing URLs according to your new site. You can thank me later.
Hurray! Now you’re done with the migration. But hang on, there are a few more things to do.
In case you have custom taxonomies and custom post types you will not be able to import them through the regular migration using the above plugin. You can easily get these options through their premium version but if you’re not willing to pay that extra money, here’s what you can do.
- The Post Type Switcher plugin in WordPress will help to easily create your custom type content that you already have in your Drupal site.
- The Taxonomy Switcher Plugin will assist in converting your Drupal custom taxonomies to WordPress categories
- Then you can have the Toolset Type plugin to maintain and support the custom type posts.
Things to do after the migration
Test, Test, Test
Now that you’ve migrated your content to WordPress, you will need to check if everything works fine. Test whether all content along with custom fields and metadata are exported correctly and the classifications in taxonomies are complete. If you updated your permalinks, go through every page and check if there are any broken links and edit them accordingly.
This is the time to verify that all your links are in order as per the list you made during the pre-migration.
Pretty things up
Migrating from Drupal does not bring the previous site templates. So now it’s the time to make your site looks and feels better using WordPress. First, you can select a suitable theme for your site among the many themes that are available in the WordPress Theme Directory. Then you can recreate your navigation menus from Appearance > Menus in WordPress.
You can also add different forms, necessary widgets, create galleries and install the must-have plugins. The fun part of WordPress is that everything can be done so easily and you can explore your creativity with just a few clicks.
Securing your site
Ensure that you secure your site with a good hosting service, an SSL certificate and the relevant security plugins. If you are newly installing an SSL certificate, then ensure you use a plugin to make sure that all your HTTP links are in order.
Consider SEO
It is vital that you improve your SEO in the new site since there’s a slight risk of losing traffic after the site migration. WordPress by default comes with SEO specific features that assist in having suitable metadata for each page. Moreover, it provides facilities to minimize your page loading time for better accessibility thus improving the search engine ranking.
Go live
Once you have done the migration and done the necessary verifications, you’re ready to go live. Make sure you have compared your websites and everything is in order.
Conclusion
The success of the migration depends on many things like the complexity of your Drupal website and the suitability of the plugins that you select for the migration. However, all of these uncertainties can be overcome with proper pre-migration planning and post-migration verifications.
The process discussed in this article is a general path taken based on research and our experience of and migrating a medium-sized site with some custom options. So there may be aspects that you will need to give special consideration to.


